Complete Press tool Design course at Industrial Level,
WhatsApp or Call 9914109883 ,
Join / Demo: Press Tool design course
Elements of Press Tool
1. SHANK
1. TOP PLATE
2. THRUST PLATE
3. PUNCH HOLDER
4. PUNCH
5. STRIPPER PLATE
6. DIE PLATE
7.DOWEL
8. BASE PLATE
9. CAP SCREW
10. GUIDE PILLAR
11. GUIDE BUSH
PRESS TOOL
Definition,
The tools which are used to shear or form sheet metals placed between a punch and die under the action of impact or continuous pressure.
Basic terminologies
- Stock strip: The various types of sheet materials from which the piece parts is made.
- Die: The cavity parts of press tool.
- Punch : Male parts of the press tool.
- Scrap: The unused or wasted portion of the stock strip.
Maintain the relative position of the top and bottom half of the press tool.
The guide pillar is placed in the bottom plate and guide bush is placed in the top plate.
- Shank – it is fixed at the top of the top plate if facilities the loading of the press tool on the press machine.
- Stopper – its function is to maintain proper positioning of the component in the die in secondary operations or to maintain proper gaps between two components.
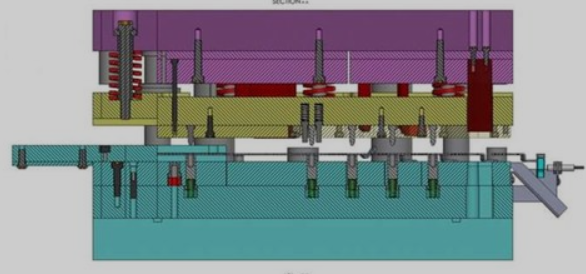
| ELEMENT | MATERIAL | HARDNESS |
|---|---|---|
| Base plate | MS | – |
| Top plate | MS | – |
| Stripper plate | EN 31 | 50-52 |
| Punch holder plate | EN 31 | 50-52 |
| Shank | MS | – |
| Punches | HCHCr D2 | 60-62 |
| Die plate | HCHCr(High carbon high chromium) D2 | 60 – 62 |
| Thrust plate | EN 31 | 50 – 52 |
| Pillar and guide | OHNS | 54 -56 |
| Bush | EN353 | 54-56 |
Description of the construction of a press tool
- Punch and die – The parts of which are directly responsible for Shearing or forming of the sheet metal.
- Stripper plate – Stripes off or remove the strip from punch Subsequent to the operation.
- Punch holder – Plate retains the position of punch and helps in the Mounting of punches.
- Thrust plate – Bears the thrust load being applied to the punch and Prevents it from penetrating into the top plate.
- Bottom plate – hold and supports are parts of the bottom half of the Press tool.
Press tool are classified into two basic type
- Shearing tools.
- Non shearing tools.
1. SHEARING TOOLS
Press tool by which a cutting profile is generated are shearing tools.
Here, the sheet metal is separated from the stock strip, by the action of a punch and die to produce the component or slug.
2. NON- SHEARING TOOL
In non-shearing tools shape is generated on the stock strip by use of punch and die without any shearing action, thereby producing the component.
1.SHEARING TOOL
Blanking Shaving
Piercing Parting
Punching Notching
Trimming Lancing
2.NON- SHEARING TOOL
Bending Beading
Deep drawing Bulging
Embossing Planning
Coining Curling
SHEARING THEORY
Stages of shearing:
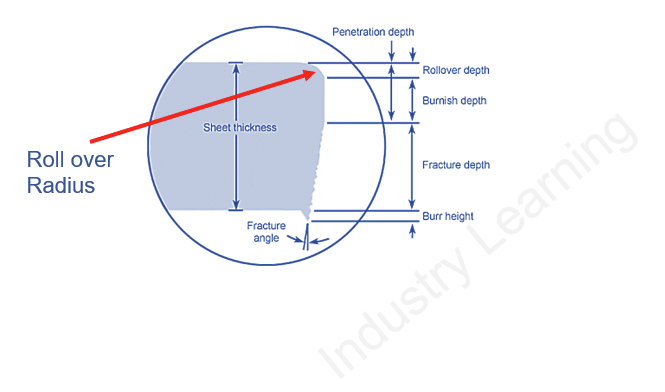
During shearing operation sheet metal is placed between the die and the punch and the punch enters into the sheet metal for shearing. the following three stages take place to produce the components.
Stage 1. Formation of roll over radius;
In this stage the punch forces on to the surface of the sheet metal and a roll over radius is formed along the edges of the die till the elastic limit of the sheet metal, material is reached and the punch enters into the plastic zone limit.
Stage 2. Penetration
When the punch further moves through the sheet metal it enters into the plastic zone and penetrates the sheet metal forming a burnished band along the edges of the punch and die surfaces. This stage continues till the end of the plastic zone and commencement of the fracture.
Stage 3. Fracture
On further entry of the punch into the sheet metal the fracture starts from the edges of the punch and the die. These fracture meet each other in stage 3. when the punch continues to move fracture inside the sheet metal.
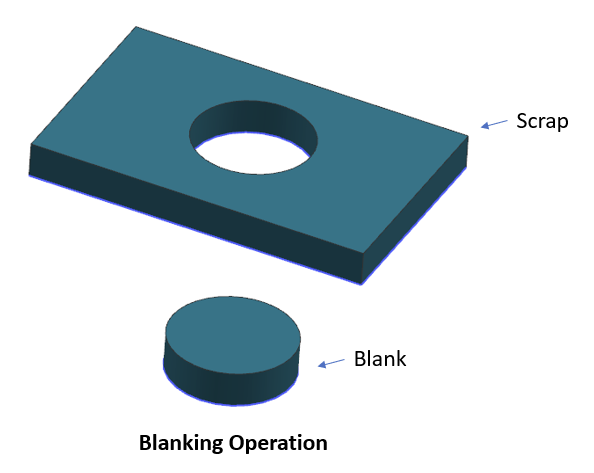
SHEARING OPERATIONS
1.BLANKING
In shearing operation, the part which comes out of the die is the required component, this operation is known as blanking operation.
In blanking the size of the profile of the die is exactly equal to the size of profile of the component and size of the punch profile is obtain by subtracting the clearance from the die profile size.
Clearance between the die and punch is given by,

Where,
c/2= clearance per side
t = sheet thickness in mm
Ts = shear strength of the sheet metal in kg/mm2.
Q. find the size of the die profile the punch profile for making a washer a given below. t=5mm, Ts (m s) =36kg/mm2.
Soln– in order to make the washer ∅50 will be produced by blanking operation and ∅25 will be produced by piercing operation.
Clearance per side both for piercing & blanking is equal to the


T = 5mm
Ts = 36kg/mm2
Blanking die profile size =Ø50mm
Blanking punch profile =50-2 x 0 ·3
=Ø49.4mm
Similarly,
Piercing punch profile size =Ø25mm
Piercing die profile size =Ø25 +2×0·3
= Ø25·6mm
3.NOTCHING
Notching is a shearing operation in which the line of shear is not closed as a result of which there remains unbalanced horizontal thrust on the notching punch.
Heels are provided all the notching punch to withstand this unbalanced side thrust on the punch.
In notching operation the clearance is given or added to the die profile of the press tool.
4.TRIMMING
The process in which the excess material is removed from a drawn or from or cast components is known as trimming operation.
5.SHAVING
Shaving is a secondary shearing operation usually done after blanking /piercing/trimming operation in order to get the edges of the sheet metal component free from roll over radius and fracture.
The clearance provided between the die &the punch is zero wear minimum.
6.LANCING
Lancing is a scrap less shearing operation.
The sheet metal is sheared and then bent at the same station.
7.PARTING OFF
It is a shearing operation in which the strip is separated into pieces along two shearing lines.In parting scarp is generated.
8.SLITTING
This is a shearing operation along a single line of shear where no scarp is generated.
FINE BLANKING
Fine blanking is a primary operation unlike shaving operation in which also the sheet metal edges of the component are free from roll over radius and fracture.
The clearance provided between the punch and the die during fine blanking operation is zero or 12 eligible because of heavy tonnage required in the blanking the die and the punch are generally made harder than normal shearing operation preferable material for die and punch are cemented carbide.
NON- SHEARING OPERATION
1.EMBOSSING
Embossing is a non- shearing operation in which on impression is given on the sheet metal, the depth of impression given on one side of the sheet metal is projected by an equal amount on the other side of the impression given at the embossed area the thickness is remains same as its parent metal.
2.COINING
It is a non-shearing operation in which an impression is given on the side of the sheet metal without allowing any projection on the other side variation of sheet thickness takes place during coining .
| Implication | Less clearance | More clearance | |
| Shearing force | More | Less | |
| Thrust force | Less | More | |
| Rollover radius | Small | Large | |
| Cut band | Large | Small | |
| Fracture | — | Irregular | |
| Burrs | Large compressive | Large tensile | |
CALCULATING CLEARANCE
THUMB RULE
| Material | Clearance in of sheet thickness |
| Mild steel | 5-6-% |
| Brass | 2· 3-3·5% |
| Aluminum | 1·5 – 2·5% |
& More practice method

C = Clearance per side of punch & die
Ts = Shearing strength of material
T = Sheet thickness
SHEAR ANGLES FOR PUNCHES AND DIE
In order to reduce the shear force required to produce a component shear angles are provided on the punch and die, Shear angle generally is 1֯ to 2֯.
Resharpening of the die and punch is done taking the shear angle into consideration.
Shear angle in a press tool is provided either on the punch or on the die.
TYPES OF PRESS TOOL
- Progressive tool
- Compound tool
- Combination tool
PROGRESSIVE TOOL
Press tool in which the final product is produced after the sheet metal is progressively moved forward in multiple stages with different operations in a single press tool are called progressive tool.
COMPOUND TOOL
A tool in which two or more cutting operations are performed in single press tool at single station and in single stroke.
Compound tool construction.
COMBINATION TOOL
A combination tool is a in which shearing and forming takes place at the same station.
STRIP WIDTH

STRIP LAYOUT
It is the most economic way in which the component are laid on the stock strip so that maximum utilization of the strip is achieve for getting the components from the press tools.
It is the first step for designing a press tool.
Deciding factors
Strip width calculation
Selection of economical strip layout
Grain direction

M is known as margin and
B is known as bridge
W is known as width of the component.
Calculation of % of material utilization

Where,
a = area of single component (a r· of out strip)
A = area of strip utilized (a r· of total strip)
n = no of component to be produced
TYPES OF STRIP LAYOUT
- Single pass layout
- Double pass layout
- Narrow run layout
- Wide run layout
- Interposed layout
- Scarp less layout
- Semi scrap less layout
In case of single pass layout the strip passes through the press tool and one scrapped there after.
In double pass layout one row of components are produced in the first pass & then the same strip is used for producing components,
in the second pass while passing the strip again through the press tool there after the strip is scraped.
strip layout are also designed based on the no of layout per strip in case of single raw it is called a single log layout ,similarly ,it may be a double lay or multiple
layout . the choice of strip layout depends on the most economic layout.
The design of strip layout also depends on the direction of the grain alignment on the rolled sheet. for those components which requires
bending,forming after blanking .the direction of the grains is so chosen that the line of bent is to the grain direction.
BRIDGE AND ALLOWANCE
While laying out components on the stock strip the gap provided between the components is known as bridge, And the gap provided between the edge of the component to the edge of the stock strip is called allowance/margin.
General rule for bridge and allowance for sheet thickness more than 2mm.
Recommended bridge and allowance
| Length of cut (mm) | Margin(mm) |
| L | a |
| Up to 65 | t |
| 65 to 200 | 1·25×t |
| Above 200 | 1·5×t |
For the sheet metal of thickness less then 2mm the bridge & allowance the kept 2mm
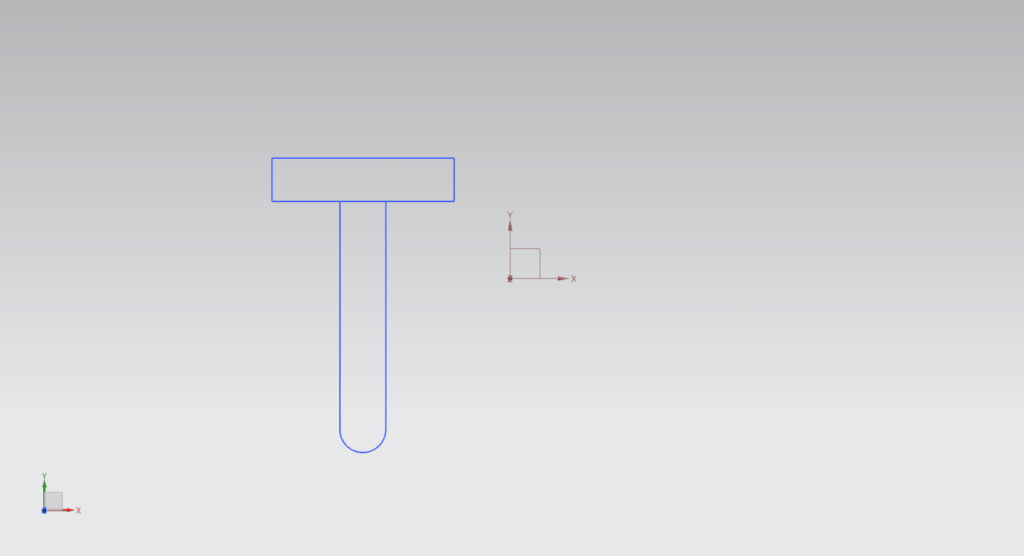
Q. find the bridge, allowance with percentage utilization of the given component (sheet thickness =3mm).
Sol.
Here,
L = 60m
∵ L is 60
∴ a = l
∴ a= 3m
> w= 80+3+3=86m
A= 86×1000 =86000m2
a =2400m2

=(23×2400)/86000×100
= 64·18%
*PILOT
Pilot are the essential element for all progressive tools. they are bullet nose and locate the strip under the punch W T H the Pre – pierced holes. the length of the pilot the greater than the length of the punch by an amount equal to the 1/3rd of the sheet thickness
The diameter of the pilot are kept 2·02mm to 0·05 mm lesser then the dia of the piercing punch depending on the accuracy of the hole position in the component.
Depending on the size of the blanking punch the pilot are either punch mounted on stand -alone pilot.
*Material of pilot are toughness and hardened tool sheet.
*Pilots are two types
(1) direct pilot
(2) indirect pilot
Pilots which locate Pre -pierced holes within the component are known as direct pilot.
In case there is no hole within the profile of the component then additional holes are made on the stock strip outside the component profile which are located by pilots and the pilot holes go into scraps.
STRIPPER PLATE
Stripper plates are used in press tool to facilities the removal of stock strip from punch wall after the stock is complete and the punch starts moving upwards.
Stripper plates are of basically two types
(1) Fixed stripper
(2) Movable (floating stripper)
(1) Fixed stripper
Fixed strippers are mounted on the die block and a passage is provided for the strip to pass through the press tool for operations.
The plates consist of screw holes for clamping on the die block with alignment.
Profiles are cut for two entry of punch
Stripper plates are made of mild steel or hardened steel depending on the volume of punch production and criticality of the punch profile.
Various types of fixed stripper are
(1) Box stripper
(2) Plate stripper
(3) Hook stripper
(1) Box stripper
## (2) Plate stripper
There is a likelihood of wear of wear of the side walls of the channels of box stripper then the channels are replaced by hardened gauge plates and soft plates are mounted on the gauge plates which are clamped together on the die plate.
Gauge plate help the strip proper guidance inside the press tool.
Gauge plates are also called guide plate. Gauge plate which is located toward the operator is called front gauge plate and the one which is away from the operator is called book gauge plate.
(3) Hook stripper
Hook stripper are used in press tool producing bent or drawn components. plates of thickness 6 to 8 mm are given the shape of hooks by bending and clamped on the die plate keeping a gap for the punch to enter but the component should not come out along which the punch during its return stroke,
Advantage of fixed stripper
- Stripper plates are rigid
- Easy for design
- Easy for assembly
- Extra components such as spring are not required
- Cost of manufacture is economical
Dis – advantages
- Doesn’t allow the operator the tool maker easy access to the die plate.
- Profile on the die plate are not visible and hence damage on the die plate is not repairable until the press tool stops during production.
Floating stripper (moveable)
The moveable stripper is mounted on the top half of the press tool keeping the die plate open to the operator or the tool maker.
Floating strippers are spring loaded plates which compress during the down stroke of the top half and eject the strip from the side walls of the punch during its up stroke.
Advantage of floating stripper
- As the stripper plate is mounted on the top half, the die plate has the clear visibility to the operator. As a result of which any damage cause to the die during operation is visible to the operator and the press can be stopped before any major breakdown occurs.
- The stock strip can be flattened by the floating stripper before the shearing operation.
Disadvantage
The construction is critical as it involves spring loaded stripper to be mounted on the top half.
*Pitch punch
Pitch punch is a notching punch used in progressive tool for maintaining the pitch of the progressive tool.
In case of manually feed strips tolerance on the pitch is kept unilaterally on the negative side.
In case the strip is feed through a roll the size of the pitch punch is made by keeping tolerance unilaterally on the positive side.
*The clearance for pitch punch is designed in such a way that.
The profile of the pitch punch is designed in such a way that the overlapping burrs do not rub with the side walls of the gauge plate and 0·5×45֯ angle is provided so that there is no obstruction for the strip to feed forward.
Shearing force

Various plate thickness,

Punch length = 70 to 80 mm (in general)
*(min m die plate thickness = 16 mm).
SHUT HEIGHT OF PRESS TOOL
It is the distance from the top bottom surface of the top plate to the bottom surface plate of a press tool at the instant when the first component from the press tool has been produced.
PRESS MACHINE SPECIFICATION
SDAU – slide down adjustment up adjustment
Stroke per minute
Maximum tonnage
Throat depth
Through whole diameter
T – slot specs
Stroke length adjustment
Q. find the shut height of a press tool for the given component (mal· ms & thick =3mm) (π=3).
Sol.

It is the point through which the total shearing load of the press tool acts. This is the point where the shank of the press tool is located.
Let us consider a component as shown in fig (1)
Let us take fig (2) as the strip layout for the component given in fig (1)
Then centre of pressure (x, ̅ y ̅ ).
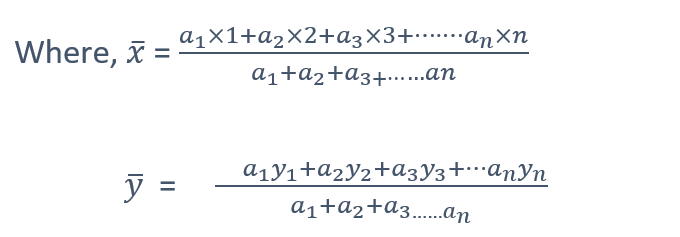
Q. Find the centre of the pressure of the given component (t=3mm, m s).
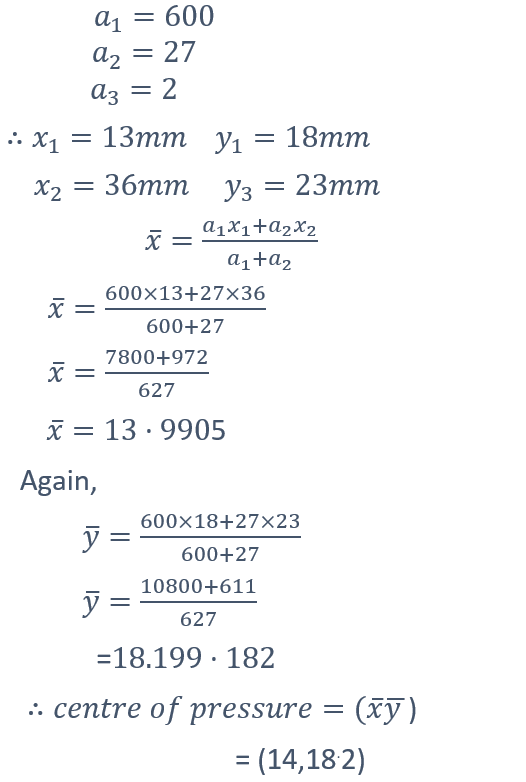
There are two kinds of stop used in press tools
1.AUTO STOP
2.FINGER STOP
Auto stops are of two types
- Fixed type
- Moveable type
The horizontal movement
The hole through which the one end of the auto stop test on the die plate are made large on high to accommodate the vertical and horizontal movement of the auto stop
An adjustable bolt is mounted with the top plate of the press tool when stroke with the adjustable bolt strips with the falls end of the auto stop, thus lifting the other end in the vertical direction.
When the stroke is withdrawn the auto stop falls on the surface of the strip due to horizontal tension provided by the horizontal spring.
When the strip is food forward the auto stop moves over the strip and falls on the die plate, on further movement of the strip the auto stop prevents the strip from moving further as it reaches its extreme position at this instant stroke is taken and the process continues thereby maintaining fixed gap /bridge between the component.
Finger stops are used in progressive tool & position at locations where the stock strip stops at station prior to the finale station to produce components so that all the operations are completed before the finale station as the stops are operated by finger they are called finger stops. finger stops are required for use only at the time when a fresh strip is inserted into the die plate for production.
…… assembled with bottom plate, top plate, pillar, bush, shank they are readily available of different standard size.
The die set are classified in two categories.
1.Two pillar die set
- Rear pillar die set
- Center pillar die set
- Diagonal pillar die set
2.Four pillar die set
Die sets are selected based on the working area and the shut height
Requirement the working area of a die set is the area available on the bottom plate after deduction the
NON-SHEARING OPERATION
BENDING AND FORMING OPERATION
Bending forming is an operation in which the sheet metals are given shape by application of pressure with the help of punch and die. if the line along which the sheet metal is formed is a straight line,
It is called bending operation.
If the line along which the foundation takes place is covered it is called forming operation.
NEUTRAL AXIS
In a bent component the inner larger of component, in the bent zone gets compressed while the other lager experiences on elongation.
for calculating the length of bent component. The straight portion are to be added with the bent length of the neutral axis is considered.

θ is a degree
t = sheet thickness
l R= internal radius
value of K between 0·3-0·5 depends on Lr / t .
| LR/t | 5 | 3 | 2 | 0·5 0·8 |
| K | 0·5 | 0·45 | 0·4 | 0·3 0·25 |
Q.Find the length of the sheet material for the given component.
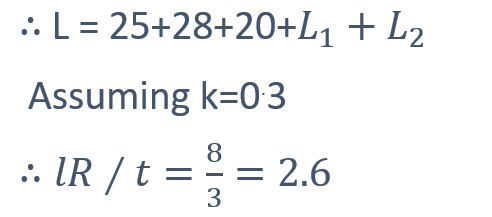
8/3
∴ k=0.5
tl =(lr+kd) θπ/180
= (6+0·4×3) × 120×3/180
=4·60
L=73+6.075+4⋅60
L=84.275
In the case of wiping the width of die opening will be –

THREE SINGLES OF BENDING OPERATION
- Draw a progressive Stage of bending
Following three stages take place during operation
- Gripping
At this stage the sheet metal is tightly held between the bending punch and the bending die
- ROCKING
The punch is descends down the die overcoming the elastic strength Of the sheet metal to give shape of the sheet metal as per the die profile.
- BOTTOMING
BENDING OPERATION
There are generally four different types of bending operation.
- Air bending
- V bending
- Wiping
- D bending
(a) Air bending
V shape can be given of various degree of angle with the same die and punch,
In air bending the shape of the component is not bottomed as a result of which the accuracy of component various with different strokes.
However, we can provide stroke pins (φ20 ma×m) which to a great extend can provide similar component in continuous stroke.
The advantage of air bending tool is different angled V – different angled V- shape components can be produced with a single air bending tool.
(b) V – bending
Enough to allow easy flow of material the V- punch nose radius equals to the internal radius of the V – shape component,
The bottoming radius in the die equals to the internal radius + sheet thickness.
(c) Wipping
90֯ bents can be perform in wiping operation in which a blunt punch with a nose radius forces sheet metal over a die whose radius is equal to the internal radius of the component.
(d) D- Bending
D – bending dies produce d – shape component with the help of a
D -shape punch and a die together with pressure pad.
The advantage of pressure pad is it produce a flat surface in the components.
Q. Find the bending length the given component.
- Draw a progressive tool strip layout.
- Find % age utilization of the layout.
- Find the total force required in tonnage.
- Find the centre of pressure (shank position).
- Find the plate thickness =lr/t=2.
Sol.


TYPES OF PUNCHES
Punches are classified generally based on the operations they performed for fig. A blanking punch does blanking operation, notching punch does notching operation, piercing punch does piercing operation etc.
Punches are also classified based on their construction namely.
- Plain punch
- Pedestal punch
- Hybrid punch
- Offset punch
1.PLAIN PUNCH
Plain punches are normal punch for simple operations like piercing, blanking etc. they are collar mounted, pin mounted, Depending on their shapes & feasibility.
2.PEDESTAL PUNCH
Pedestal punches are punches with a large base area. for mounting pedestal punches, punch holder plate are not required.
These punches are used where a greater force is required so that the force is disturbed over a large area.
4.OFFSET PUNCH
Sometime it is required to have punches with offset base in order to accommodate other punches in close vicinity.
Such type of punches is called offset punches.
PUNCH MOUNTING METHODS
There are four different kinds of punch mounting method
- Collar mounting
- Screw mounting
- Pin mounting
- Peen mounting
1.COLLAR MOUNTING
Small punches with do not require large force are collar mounted.These punches are mounted a punch holder with either a square or on angular collars. the base of the collar is finished with the surface of the punch holder plate in assembly case should be taken that the punch is exactly to the base area of the punch holder plate.
Collar mounted punches having angular collar are preferable over square collars as the collars have a tendency to break due to concentration of stress at the sharp.
Directly on the top plate depending on space availability these punches are directly mounted
3.PIN MOUNTED
Slender punches which are having difficulty to maintain collars are pin mounted. two pins are inserted through the punch and pin are mounted on the punch holder plate on a slot made on the punch holder plate. Case should be taken that the punches are lr to the plate holder plates in assembly.
4.PEEN MOUNTED
Punches are sometime peened at the bottom area with a sharp tool so that the punches do not fall down during operation this method of mounting is a crude method and are generally avoided for precision tool making.
5. ARALDITE MOUNTED
In araldite punch mounting method, a large clearance is kept between the punch holder plate and punch, where araldite is allowed to set for 24 hours after which the punch become ready for use. The method of mounting is also very crude method & not used in precised tool making & where more stripping force is required.
TYPES OF DIES
Dies are classified based on the type of their construction.
- Solid die
- Inserted die
- Split die
Solid die – dies which are made of single piece containing all the required profile are called solid die.
Advantages
- Design & manufacturing is easy
- Easy maintenance
- Low cost
Disadvantage
- Damage of any one of the profiles of the die will require either replacement of the die or repair leading to loss of some portion of undamaged profile.
- Simple profile like square, rectangle will require costly operation like wire EDM.
INSERTED DIE
Dies which make use of local inserts are called inserted dies. A small size of profile machined on an insert is inserted in a die plate which may be made of soft steel.
ADVANTAGES
- Damage in any inserts will require replacement of that particular insert only, thereby reducing the repair time.
- The cost of the die can be remark only reduced by using small insert on big size die.
Dis -advantage
- Machining and assembly require skilled technician.
- Repair requires skill technician.
SPLIT DIES
Some times dies are split into several pieces which are assembled together to from a single die. Split dies require a housing for its mounting so that the dies do not split apart during operation.
ADVANTAGES
- Damage in the die will require replacement of that particular split, thereby reducing the cost of maintenance.
- Complicated or simple profiles can be machined by using conventional m/cs only.
Dis advantage
A housing is required for mounting the die.
H is a non – shearing operation in which a flat sheet metal is given the shape of a cup or box or cylinder by application of pressure.
In this process the material at the circumferences experience compression & the material along the axis of the cylinder experiences tensile strength the portion of the material at the bottom does not experience only tensile or compression.
Draw terminology
1.Re-drawing
Components which require more than one number of draws are redrawn to get the final component in successive stages for each draw separates draw tools are designed and manufactured.
2.Shallow draw
Drawn piece parts which require a single draw are called shallow draw. deciding whether a component requires a single or more than one draws depend on the H/D ratio.
H/D No. of Draws
<0·75 1
0· 75-1·5 2
1·5-3·0 3
3·0-5·5 4
DRAW SPEED
The speed at which the material can be drawn is a very important factor this is the speed at which the material can be drawn into the die cavity.
Al – 150fpm
Brass – 200 fpm
Copper – 150 fpm
Steel – 50 fpm
Reduction ratio (D-d)/D
Where D= diameter of blank
d=cup dia
(Component die)
Calculation for blank Dia, D

Where,
h = height of cup
D = blank dia
d= cup dia

Recommended draw ratio for sheet
1st draw 40%
Punch radius is provided as the profile of the component required.
*Punch radius is provided as the profile of the component required
Where,
D= blank dia
d = cup dia
t = sheet thickness
*FORMULA FOR DRAW FORCE

*Where,

Q. Find the no. of draws & dia of cup at the end of the each draw?
Sol.
Here,
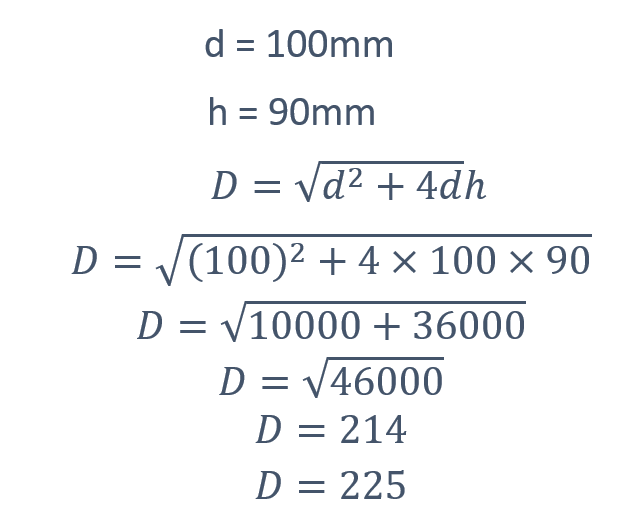
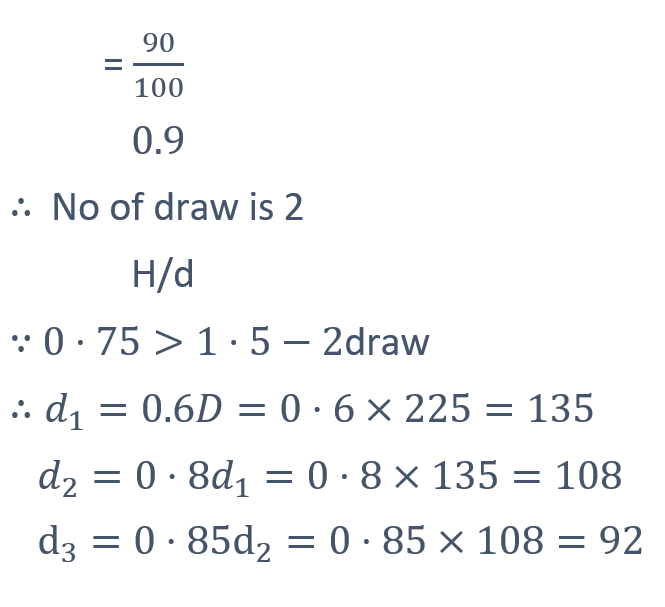
Q.
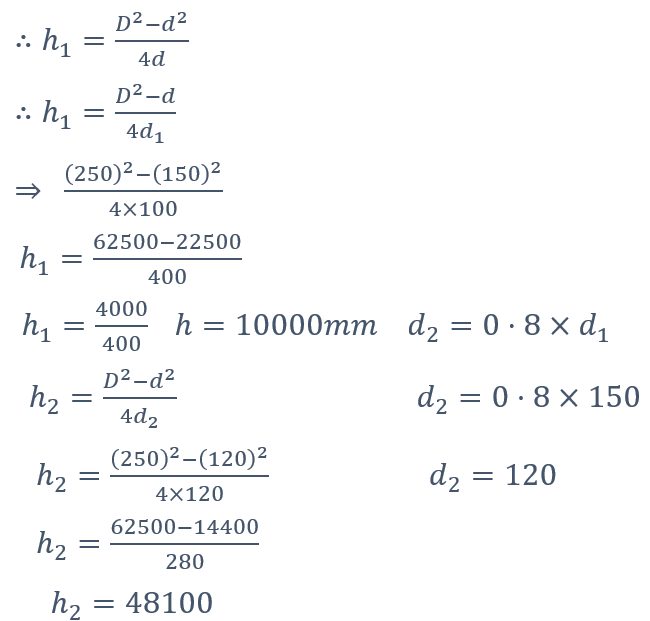
Find the draw force for the component given.
Find the cup dia after first draw.
Find the hight of the cup after each draw. (Sheet thickness 3mm, of m.s)
Sol. 1.
Here,

2.

3.

For Complete Press tool Design course at Industrial Level,
